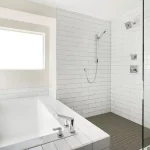
If you’re in the process of renovating your bathroom and need to install drywall around the shower, it’s important to know how to do it properly. Drywall is a great solution for preventing risks of inflammation, water absorption, and growth of mildew and mold in the house, but it can’t stand too much moisture. This means that finishing drywall around a shower requires some extra care and attention.
One common problem with drywall is the paper tape used to bind the joints. Molds can easily eat paper tapes and grow faster, causing damage to the drywall. But don’t worry, in this article, we’ll show you how to finish drywall around a shower and provide you with some important tips to ensure that your bathroom renovation is a success.
6 Steps To Finish Drywall Around A Shower
If you want to finish drywall around a shower like a professional, you should use a shower bead. Here are the six steps you need to take to install a shower bead and finish your drywall around a shower:
Step 1: Test The Shower Bead
Before installing the shower bead, it’s important to test it to see if it lays flat on the wall. To do this, cut a small piece of the bead and lay it against the wall. If it doesn’t fit flat, tear off a strip of the support leg until it fits perfectly.
Step 2: Cut The Bead To Fit The Drywall
Now that you’ve tested the shower bead, you need to cut it to fit the length of the drywall. Use a regular hacksaw to cut the bead to the proper length.
Step 3: Set The Bead Into The Drywall
After cutting the shower bead, spray it with Trim-Tex adhesive spray. Without any delay, press the bead into the drywall and make sure the legs are in position.
Step 4: Staple The Leg
Staple the mud leg every six inches with 1/2 inch staples. These staples will provide the final support for the shower bead, so make sure to keep the same distance between each staple.
Step 5: Mud & Sand
Prepare the shower bead by applying drywall mud, then sand it smooth. Once the mud is dry, remove the tear-off strip from the bead.
Step 6: Caulk The Gap
Caulk the gap between the shower and the shower bead to prevent moisture transfer. This will complete the installation of the drywall around the shower.
By following these six steps, you can install a shower bead and finish drywall around a shower like a pro. With the right tools and instructions, this process can be completed with ease.
6 Advantages Of Using Shower Bead To Finish Drywall Around A Shower:
1. Uses Less Compound:
When finishing drywall around a shower, shower beads are an excellent option as they require less drywall compound. Mud used to fill the gap between the shower wall and drywall consumes a lot of the compound, which is not the case with shower beads.
2. Less Messy:
Shower beads are less messy when compared to other options available for finishing drywall around a shower. The tear-off strips of the shower bead prevent any mess during installation.
3. No Paper Tape:
During the installation of shower beads, you do not need to use paper tape. This reduces the risk of mold growth in the wall. Mold and mildew can destroy a wall within a short period, and the absence of paper tape significantly reduces this risk.
4. No Screws:
Shower beads do not require screws to fit in the wall. The long mud legs of the shower bead can easily go across the gap between the shower flange and the drywall. Staples are used to hold the beads, which saves money and eliminates the need for a drill.
5. Saves Time:
Using shower beads saves time during installation. You do not need to wait for the mud to dry before applying the next coat, which is necessary when using paper tape.
6. Available At Drywall Suppliers:
Shower beads are readily available at drywall suppliers, making them an easy option to acquire for finishing drywall around a shower.
Using shower beads to finish drywall around a shower provides numerous advantages, including the use of less compound, less mess, no paper tape, no screws, time-saving, and easy availability at drywall suppliers.
5. Saves Time:
Using a shower bead to finish the drywall around your shower is a time-saving option. This is especially important in today’s busy world where time is valuable. It is a professional and affordable way to complete the job quickly without compromising quality.
6. More Durable:
Shower beads made from PVC are highly durable and resistant to rust and mold even in moist environments.
Bottom Line:
Finishing drywall around a shower is a crucial task that must be done with care. Any mistake could compromise the hygiene level of your home. By following the steps outlined in this article, you can ensure that your shower wall remains in good condition for a long time.