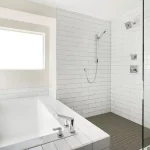
If you’re looking to add a touch of luxury to your bathroom, installing a freestanding air tub might be the way to go. While there are various options available, freestanding air baths are the most unique and eye-catching. Fortunately, the installation process is straightforward and can be completed even if you’re not a professional.
To begin, you’ll need to choose a bathtub that fits your bathroom’s dimensions and style. Once you have your tub selected, you can gather the necessary tools and materials and get started on the installation. This guide will walk you through the steps of installing a freestanding tub on a concrete slab, from marking the location to installing the leftover components.
Freestanding Tubs: An Overview
When selecting a freestanding tub, it is important to consider the faucet that will be used with it. Some freestanding tubs come with a deck or ledge that can be used to mount the faucet, while others require a wall-mounted faucet. If your tub has a connected deck, you can choose from a range of freestanding faucets.
Before installing the bathtub, ensure that you have all the necessary tools and supplies on hand. It is also important to prepare the space for the tub by ensuring that the floor is level. A freestanding bath can be installed on a concrete floor without any issues. To create a flat platform for the bath to sit on, you can use a bath board or a similar item.
Freestanding tubs are available in various materials, including acrylic, fiberglass, and more. Footed and pedestal bathtubs are also popular options. When selecting a freestanding tub, consider the style, size, and material that will best suit your needs and preferences.
Things To Consider Before Installing A Freestanding Tub
Functionality Of Tub
When it comes to choosing a freestanding tub, functionality is key. The tub should not only be aesthetically pleasing but also serve its purpose as a bathtub in your bathroom. It is important to do your research and choose a tub that conveys elegance and style.
Choose Tub According To Bathroom Space
The size and style of your freestanding tub should be chosen according to the available bathroom space. There are many different sizes and styles of freestanding bathtubs available in the market. The construction of the tub also varies, with some being mounted straight on the floor using conventional legs.
Before installing a freestanding tub, it is important to consider your bathroom’s plumbing, windows, and lighting. If the building is brand new, ensure that the bathroom is designed with ample space to accommodate the tub.
To choose the right size of the freestanding bathtub, measure the available bathroom space. You’ll adore the claw foot design or egg shape, but the size of your bathroom will influence the style and shape you choose.
It is recommended to consult a professional plumber before installing a freestanding tub. This will ensure that the plumbing, wall studs, pipes, and plumbing drain are installed correctly. Additionally, it is important to consider the plumbing trap, platform, and pressure to avoid leaks.
Different materials are used in the construction of freestanding tubs, including acrylic, cast iron, and stone. Choose a material that is waterproof and easy to clean.
In summary, before installing a freestanding tub, consider the functionality, bathroom space, plumbing, different materials, and aesthetic appeal. By doing so, you’ll be able to choose a tub that is both functional and decorative.
Steps To Install A Freestanding Tub On Concrete Slab
Collected Needed Tools And Materials
Before starting the installation process, it is essential to gather all the necessary tools and materials. The following table lists the required tools and materials:
| Tools | Materials |
|---|---|
| Level | Freestanding Tub |
| Drill | Plumber’s Putty |
| Rubber Mallet | Sealing Material |
| Notched Trowel | Wood Piece |
| Drywall Screws | Drainage |
| Screws | Drain and Overflow |
| Tailpiece | Spray Area |
| Threaded Drain | Required Tools |
| Faucet | Remaining Components |
| Spout Pipe | Drain Channel |
Mark Location For Tub Installation
Choosing the right location for the tub is crucial. Consider the following factors:
- Placement near a window for natural light
- Proximity to plumbing for easy drainage
Ensure that the location is marked correctly before installing the tub. If you plan to position the tub far away from the plumbing, additional plumbing work might be necessary.
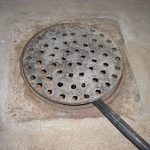
Clean Drain Pipe Point
It is essential to clean the drain hole before installing the tailpiece. Follow the steps below:
- Remove the drain hole cover if used in the previous step.
- Check for any obstructions inside the drain hole and clean it.
- Fill the drain hole with dry silicone.
- Pour some dry silicone around the drain hole.
- Clean the drain hole with mild washing soda.
Install Drain Pipe Parts
After cleaning the drain pipe point, install the drain pipe parts. Follow the steps below:
- Install the drain tailpiece under the bottom side.
- Secure the drain tailpiece by screwing it in place until it is firmly attached.
- Join and seal the opposite end of the drain pipe.
Install Bathtub
If your bathtub sits on a wall, follow the steps below to install it:
- Check if the tub is in the correct position.
- Use a cordless drill and drywall screws to fasten the tub to wall studs.
- Ensure that the screws are firmly linked.
Install Leftover Components
The final steps involve installing the remaining components. Follow the steps below:
- Install the overflow rod according to the product handbook instructions.
- Install the bathtub drain linkage by following the manual’s directions.
After completing the installation process, test the tub to ensure it is functioning correctly.